Monday, December 03, 2012

MVC Cascaded Drop Down List


MVC have helpers for dropdownlist and they work great, and you can build the template for them too.
But for cascaded drop downlist its different because I think, there is a lot of ways to implement it.
So I will try to build cascade dropdownlist template that can be used more than once in a form with an AutoPostBack ability too.

First of all we need model for the dropdownlist and a model for Cascade dropdownlist as below:

   1:      public class DropDownListViewModel
   2:      {
   3:          public string Value { get; set; }
   4:          public bool AutoPostBack { get; set; }
   5:          public IEnumerable<SelectListItem> Items { get; set; }
   6:      }
So value is for the selected value for the drop dow, autopostback is a flag to indicate autopostback to the form.

And for the cascaddropdown model as below:

   1:    public class CascadDropDownListViewModel
   2:      {
   3:          public string Value { get; set; }
   4:          public bool AutoPostBack { get; set; }
   5:          public string ParentDropDownName { get; set; }
   6:          public string Action { get; set; }
   7:          public IEnumerable Items { get; set; }
   8:      }
The parentdropdownname, is the name of the parent control so that it can update when it changes, the action property is the name of the action used to fill the cascade dropdownlist, it will be a json action
Lets add two editor templates that will work with these models
For dropdownlist

   1:  @if (Model.AutoPostBack)
   2:  {
   3:      @Html.DropDownList("Value",Model.Items, new { onchange="this.form.submit();" })
   4:  }
   5:  else
   6:  {
   7:      @Html.DropDownList("Value",Model.Items)
   8:  }
For the cascade dropdownlist

   1:  @model WebAdvEx.Portal.Models.CascadDropDownListViewModel
   2:   
   3:  @if (Model.AutoPostBack)
   4:  {
   5:      @Html.DropDownList("Value",Model.Items, new { action=Model.Action, cascad="yes", parent=Model.ParentDropDownName+"_Value" ,onchange="this.form.submit();" })
   6:  }
   7:  else
   8:  {
   9:      @Html.DropDownList("Value", Model.Items, new { action=Model.Action, cascad="yes", parent=Model.ParentDropDownName+"_Value" })
  10:  }
We need some Javascript to let the controls be alive,

   1:  <script type="text/javascript">
   2:          $(document).ready(function () {
   3:              $('select[cascad=yes]').each(function () {
   4:                  var action = $(this).attr('action');
   5:                  var drop = $(this);
   6:                  var parent = '#' + $(this).attr('parent');
   7:   
   8:                  $(parent).change(function () {
   9:                          $.getJSON(action, { id: $(parent).val() },
  10:                              function (items) {
  11:                               
  12:                                  drop.empty();
  13:                                  $.each(items, function (index, item) {
  14:                                      drop.append($('<option/>', { value: item.Value, text: item.Text }));
  15:                                  });
  16:                              });
  17:                  });
  18:              });
  19:          });
  20:  </script>
So in summary, looking for any cascade, getting the parent for the control, assigning a new change event, calling the action to get the data in Jason and update the cascade control
A sample of the control code and the controller view
In my controller I have a model with dropdownlist and cascade dropdownlist and im filling them as below:

   1:    model.Country = new DropDownListViewModel() { 
   2:                  Value = model.CountryId.ToString(), 
   3:                  Items = model.GetCountryList(),
   4:               AutoPostBack=false};
   5:   
   6:              model.City = new CascadDropDownListViewModel()
   7:              {
   8:                  Value = model.CityId.ToString(),
   9:                  Items = model.GetCityList(model.CountryId),
  10:                  AutoPostBack=false,
  11:                  ParentDropDownName="Country",
  12:                  Action = Url.Action("UpdateChildList")
  13:   
  14:              };
  15:   
  16:              return View(model);

the function used to fill the cascade after the parent is changed is as below:

   1:   public JsonResult UpdateChildList(int id)
   2:          {
   3:              var indexViewModel = new IndexViewModel();
   4:              return Json(indexViewModel.GetCityList(id),JsonRequestBehavior.AllowGet);
   5:          }
Im using sample data, so indexviewmodel is only a temp thing for testing and bloging, normally we build in the correct location, the idea is to return some sample data as below:

   1:   public IEnumerable<SelectListItem> GetCityList(int CountryId)
   2:          {
   3:              var result = new List<SelectListItem>();
   4:              switch (CountryId)
   5:              {
   6:                  case 1:
   7:                      result.Add(new SelectListItem() { Value = "1", Text = "Abu Dhabi" });
   8:                      result.Add(new SelectListItem() { Value = "2", Text = "Dubai" });
   9:                      result.Add(new SelectListItem() { Value = "3", Text = "Sharja" });
  10:                      break;
  11:                  case 2:
  12:                      result.Add(new SelectListItem() { Value = "4", Text = "USA City 1" });
  13:                      result.Add(new SelectListItem() { Value = "5", Text = "USA City 2" });
  14:                      result.Add(new SelectListItem() { Value = "6", Text = "USA City 3" });
  15:                      break;
  16:                  default:
  17:                      result.Add(new SelectListItem() { Value = "7", Text = "Germany City 1" });
  18:                      result.Add(new SelectListItem() { Value = "8", Text = "Germany City 2" });
  19:                      result.Add(new SelectListItem() { Value = "9", Text = "Germany City 3" });
  20:                      break;
  21:              }
  22:   
  23:   
  24:              return result;
  25:          }

Mission done, cascade dropdownlist are linked and working fine. 

Saturday, October 06, 2012

Visual Studio 2012 Launch - Abu Dhabi


Visual Studio 2012 Launch - Abu Dhabi

Microsoft

Sunday, October 7, 2012 from 9:30 AM to 3:00 PM (GST)

Abu Dhabi, United Arab Emirates


Visual Studio 2012 Launch with Celebrity Speakers: David Chappell and Orville McDonald 
Organizations that are able to move forward with velocity on realizing value opportunities through such modernization investments as Application Lifecycle Management (ALM) stand to attain a competitive advantage in the industries they serve. Organizations that are first to realize such opportunities stand to establish ground as domain leaders. We are excited to announce the newVisual Studio 2012 at a launch event with David Chappell, Chappell & Associates, world renowned Technologist and Orville McDonald, Director Product Management, Visual Studio, Microsoft Corporate.

Agenda:
09:30-10:00   Coffee & Networking
10:00-10:50   Keynote: Evolve; Rediscover Relevancy - Orville McDonald, Director Product Management, Microsoft
10:50-12:00   Application Lifecycle Management for IT Leaders - David Chappell, Technologist
12:00-13:00   Lunch
13:00-14:00   Friction-Free Collaboration for Development and Operations
14:00-14:15   Coffee Break
14:15-15:00   Continuous Quality Enablement


Tuesday, September 11, 2012

Booting from Win8 VHD with your Win7


To set up Windows 8 as Virtual Machine and boot from it, without effecting your Win7, you can use the following:-
download the needed files from: http://github.com/naeemkhedarun/CreateWindows8VHD
You can use the steps there but I have small changes to let it work with my Win7

·         Run PowerShell
·         Go to the folder with the scripts “C:\projects\CreateWindows8VHD “ by executing:   
C:
Cd C:\projects\CreateWindows8VHD>

·         Import the function “Create-Windows8VHD.ps1 “ by executing:
set-executionpolicy unrestricted
Import-Module .\Create-Windows8VHD.ps1

·         Create the VHD noting the parameters with the following:
Create-Windows8VHD "[VHD file location and name]" "[Size in MB]" "[Drive Letter]", example:
Create-Windows8VHD "D:\vhd\windows8.vhd" "10000" "X"

·         Following this to set up a dual boot record you can do:
C:\Windows\sysnative\bcdboot [Drive Letter]:\Windows
C:\Windows\System32\bcdboot X:\Windows

·         You should now be able to restart into the Windows 8 Preview!, restart your computer and you will get a windows start up page, then select your windows 7 or windows 8

Sunday, August 12, 2012

Welcome to the Windows Store

Finally I completed my registration for Microsoft Windows Store, and I can start submitting applications there. My Kids Metro Studio App will need some final tuning before submitting it, but its know a matter of some days and for me some time managements planning.

The steps to complete the Microsoft Windows Store registration process were as follow:
1. Complete one windows 8 boot camp (did this in Dubai - UAE)
This is an event that Microsoft is doing around the globe and its a great chance to learn stuff and meet people interested in Windows 8 development

2. Register and attend one Windows 8 App Quality Lab
This is a very useful session that you will show your application to Metro Style Developer from Microsoft and they will support, asset and direct you on the right track to complete your app.

3. Register your app http://win8.msregistration.com here and full the survey, and I believe if they see and feel your app is ready or can be ready for the store they will provide you with a token, you can find it after few days on the Application Excellence Survey Results, at the bottom of the page.

For more details on the exact location
go to http://win8.msregistration.com and login

From the Default.aspx page, Go to App Profiles
You will find your app that you added with the survey link (click this link) from the Microsoft developer, Below the survey you will find the token key with the following
[Your name] has a Token, granted by [Microsoft Develoepr]. Token: [Your Tokken]

Note: The Token is the Registration Code

4. Go to the windows store web site and login, start filling the forms for the registration for the windows store account, when you come by the Registration Code, enter your Tokken, complete the payment (its currently free )

5. That's it, you will receive a welcome letter from the store, and you can start uploading your win 8 apps.


Sunday, August 05, 2012

A day at the office

A day at the office full of development and fun. Sometimes quite and productive


Sometimes tutoring


 Sometimes learning

Sometimes crashed and crazy

But always ending with fun and understanding

days that can't be forgotten.

Thanks Ali Nawas for the great photos
more can be accessed here 


Windows 8 Developer Boot Camp - 2 days


Windows 8 Developer Boot Camp is set to be on 2nd & 3rd Sept. 2012 at Dubai, covering Windows 8, Windows Azure and Visual Studio 2012

The Agenda for the 2 days is as below
Agenda:
Day-1


Subject
09:30
-
10:30
Morning Coffee & Networking
10:30
-
11:30
Introduction and Keynote
11:30
-
12:30
Traits of Great Metro Style Applications
12:30
-
13:30
Lunch Break
13:30
-
14:30
Platform for Metro Style Applications
14:30
-
15:30
Tools for Building Metro Style Applications
15:30
-
16:00
Coffee Break
16:00
-
17:00
Windows 8 and Windows Azure
17:00
-
17:30
Day 1 Wrap Up


Agenda:
Day-2*


Subject
09:30
-
09:45
Morning Coffee & Networking
09:45
-
10:00
Day 2 introduction
10:00
-
11:00
All About Visual Studio 2012 and Launch
11:00
-
12:30
App Lab
12:30
-
13:30
Lunch Break
13:30
-
17:45
App Lab
17:45
-
18:00
Day 2 Wrap Up
*For Day 2, you need your PC with Windows 8 Release Preview & Visual Studio 2012

When:
2nd Sept. 2012 09:30-17:30 
3rd Sept. 2012 09:30-18:00

Where:
Al Saker Ballroom, 
Le Royal Méridian Hotel, 
Jumeirah Beach Residence


View Larger Map

Wednesday, July 25, 2012

RDLC Reports in MVC Web application


Step by Step adding an RDLC report to MVC4 project

For any large project, reports will be needed. I love RDLC so I’m sticking with them. I had some problems in the beginning but with some search here and there and some testing it start working. So I will describe it from the beginning.
Requirements:
·         In my new MVC I need to have a number of RDLC reports
·         I need the reports to read from objects, direct entities or report objects (for large reports I prefer to something like a Report View Model, in the end a report is view for data)
·         A report my require one or more data sets
·         Some of the reports will need parameters that the user will select from the MVC pages
·         I want to export the report by  PDF, but having word and Excel would be an advantage
·         Some report standardization point that is needed:
o   Required reports have a description title
o   Required have right and left main and sub headers
o   Required to have the user name printing the report in the footer
o   Required to have the printing date on the footer
o   Required to have number of page and total pages in the footer
o   All the reports are A4 stander reports ready for printing.
o   Reports will be multi language (currently English and Arabic)
o   Reports may contain charts and bars
o   Reports need to be secure
·         The system contains an alert module and some of the requirement needs the PDF document to be attached to the email.

So lets start clean and from the beginning.
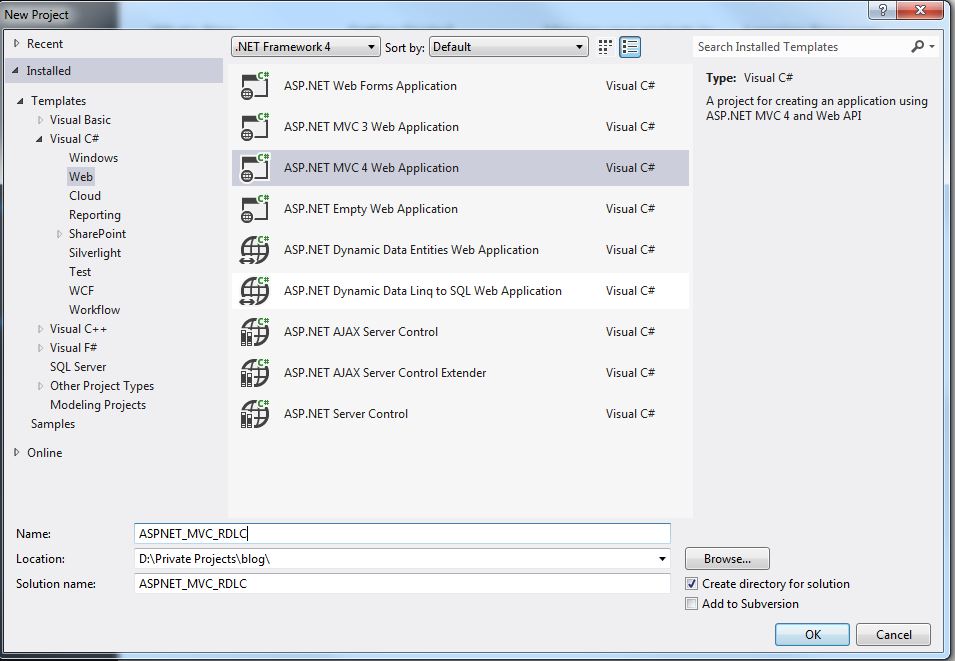
Lunching Visual Studio, selecting new project
Selecting MVC4, intrenet application (all template will work too)

Adding a new project with the name: ASPNET_MVC_RDLC

I will start putting it all in one project; it’s the same if you have business and data access layers that are in separate projects too, only to make it short im putting it all together and skipping testing too.


 So let’s start by adding the report view model that will handle the report parameters, headers and data sets


   1:  using System;
   2:  using System.Collections.Generic;
   3:  using System.Linq;
   4:  using System.Web;
   5:  using Microsoft.Reporting.WebForms;
   6:  using System.Web;
   7:  using System.Web.Mvc;
   8:   
   9:  namespace ASPNET_MVC_RDLC.Models
  10:  {
  11:      public class ReportViewModel
  12:      {
  13:          public enum ReportFormat         { PDF=1,Word=2,Excel=3}
  14:          public ReportViewModel()
  15:          {
  16:              //initation for the data set holder
  17:              ReportDataSets = new List<ReportDataSet>();
  18:          }
  19:   
  20:          //Name of the report
  21:          public string Name { get; set; }
  22:   
  23:          //Language of the report
  24:          public string ReportLanguage { get; set; }
  25:   
  26:          //Reference to the RDLC file that contain the report definition
  27:          public string FileName { get; set; }
  28:   
  29:          //The main title for the reprt
  30:          public string ReportTitle { get; set; }
  31:   
  32:          //The right and left titles and sub title for the report
  33:          public string RightMainTitle { get; set; }
  34:          public string RightSubTitle { get; set; }
  35:          public string LeftMainTitle { get; set; }
  36:          public string LeftSubTitle { get; set; }
  37:   
  38:          //the url for the logo, 
  39:          public string ReportLogo { get; set; }
  40:   
  41:          //date for printing the report
  42:          public DateTime ReportDate { get; set; }
  43:   
  44:          //the user name that is printing the report
  45:          public string UserNamPrinting { get; set; }
  46:   
  47:          //dataset holder
  48:          public List<ReportDataSet> ReportDataSets { get; set; }
  49:     
  50:          //report format needed
  51:          public ReportFormat Format { get; set; }
  52:          public bool ViewAsAttachment { get; set; }
  53:   
  54:           //an helper class to store the data for each report data set
  55:          public class ReportDataSet
  56:          {
  57:              public string DatasetName { get; set; }
  58:              public List<object> DataSetData { get; set; }
  59:          }
  60:   
  61:          public string ReporExportFileName { get {
  62:              return string.Format("attachment; filename={0}.{1}", this.ReportTitle, ReporExportExtention);
  63:          } }
  64:          public string ReporExportExtention
  65:          {
  66:              get
  67:              {
  68:                  switch (this.Format)
  69:                  {
  70:                      case ReportViewModel.ReportFormat.Word: return  ".doc"; 
  71:                      case ReportViewModel.ReportFormat.Excel: return ".xls"; 
  72:                      default:
  73:                          return ".pdf";
  74:                  }
  75:              }
  76:          }
  77:   
  78:          public string LastmimeType
  79:          {
  80:              get
  81:              {
  82:                  return mimeType;
  83:              }
  84:          }
  85:          private string mimeType;
  86:          public byte[] RenderReport()
  87:          {
  88:              //geting repot data from the business object
  89:   
  90:              //creating a new report and setting its path
  91:              LocalReport localReport = new LocalReport();
  92:              localReport.ReportPath =System.Web.HttpContext.Current.Server.MapPath(this.FileName);
  93:   
  94:              //adding the reort datasets with there names
  95:              foreach (var dataset in this.ReportDataSets)
  96:              {
  97:                  ReportDataSource reportDataSource = new ReportDataSource(dataset.DatasetName, dataset.DataSetData);
  98:                  localReport.DataSources.Add(reportDataSource);
  99:              }
 100:              //enabeling external images
 101:              localReport.EnableExternalImages = true;
 102:   
 103:              //seting the partameters for the report
 104:              localReport.SetParameters(new ReportParameter("RightMainTitle", this.RightMainTitle));
 105:              localReport.SetParameters(new ReportParameter("RightSubTitle", this.RightSubTitle));
 106:              localReport.SetParameters(new ReportParameter("LeftMainTitle", this.LeftMainTitle));
 107:              localReport.SetParameters(new ReportParameter("LeftSubTitle", this.LeftSubTitle));
 108:              localReport.SetParameters(new ReportParameter("ReportTitle", this.ReportTitle));
 109:              localReport.SetParameters(new ReportParameter("ReportLogo", System.Web.HttpContext.Current.Server.MapPath(this.ReportLogo)));
 110:              localReport.SetParameters(new ReportParameter("ReportDate", this.ReportDate.ToShortDateString()));
 111:              localReport.SetParameters(new ReportParameter("UserNamPrinting", this.UserNamPrinting));
 112:   
 113:              //preparing to render the report
 114:   
 115:              string reportType = this.Format.ToString();
 116:             
 117:              string encoding;
 118:              string fileNameExtension;
 119:   
 120:              //The DeviceInfo settings should be changed based on the reportType
 121:              //http://msdn2.microsoft.com/en-us/library/ms155397.aspx
 122:              string deviceInfo =
 123:              "<DeviceInfo>" +
 124:              "  <OutputFormat>" + this.Format.ToString() + "</OutputFormat>" +
 125:              "</DeviceInfo>";
 126:   
 127:              Warning[] warnings;
 128:              string[] streams;
 129:              byte[] renderedBytes;
 130:   
 131:              //Render the report
 132:              renderedBytes = localReport.Render(
 133:                  reportType,
 134:                  deviceInfo,
 135:                  out mimeType,
 136:                  out encoding,
 137:                  out fileNameExtension,
 138:                  out streams,
 139:                  out warnings);
 140:   
 141:              return renderedBytes;
 142:          }
 143:      }
 144:      
 145:  }


lets add a new report called MyMVCReport.rdlc as below:
we will need to add some stub methods to set the report data sources

Set the data source for the report using the stub methods


   1:  using System;
   2:  using System.Collections.Generic;
   3:  using System.Linq;
   4:  using System.Web;
   5:   
   6:  namespace ASPNET_MVC_RDLC.Models
   7:  {
   8:      public class Business
   9:      {
  10:          public List<Employee> StubForEmployeeDataSet()
  11:          {
  12:              //this is used only to help in adding the dataset of type employee to the report definition
  13:              return null;
  14:          }
  15:          public List<Project> StubForProjectDataSet()
  16:          {
  17:              //this is used only to help in adding the dataset of type project to the report definition
  18:              return null;
  19:          }
Note: in production code, I don't recommend putting this in the business layer, any report stub class will be better.


Set the data source for the report using the stub methods
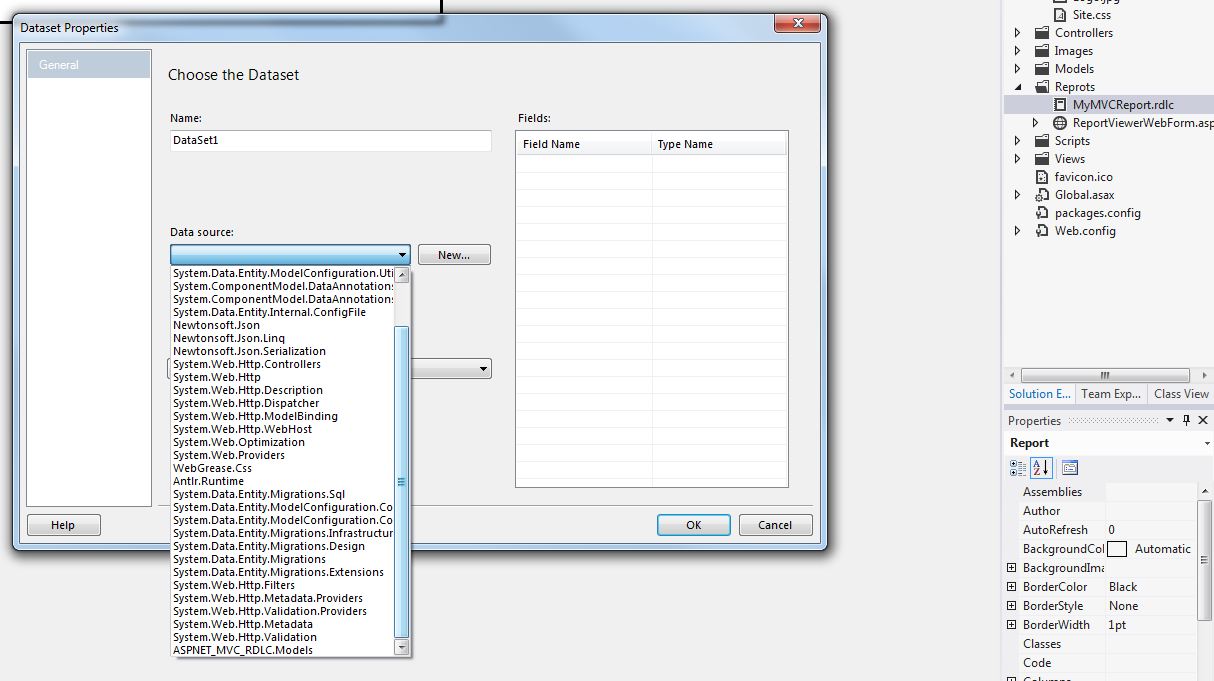
so we have a problem here when selecting add data set from the report menu, the data source drop down list is empty, and when you click new it open a connection to the database.
So after some search I found a solution from stackoverflow, simply add a web form page to the MVC project and it will start working, I didn't have time to check why is this, but it works.
lets add another one.


lets set the design and layout of the report
the above is only for testing.

coming near the last steps , we need to add a reference to the Microsoft web form reports assembly

now lets add the controller that will produce the report.

   1:  using System;
   2:  using System.Collections.Generic;
   3:  using System.Linq;
   4:  using System.Web;
   5:  using System.Web.Mvc;
   6:  using ASPNET_MVC_RDLC.Models;
   7:   
   8:  namespace ASPNET_MVC_RDLC.Controllers
   9:  {
  10:      public class ReportController : Controller
  11:      {
  12:          public ActionResult PrintRepert()
  13:          {
  14:              //geting repot data from the business object
  15:              var Business = new Business();
  16:              var reportViewModel = Business.GetMyRepoertViewModel();
  17:   
  18:              var renderedBytes = reportViewModel.RenderReport();
  19:   
  20:              if(reportViewModel.ViewAsAttachment)
  21:                  Response.AddHeader("content-disposition", reportViewModel.ReporExportFileName);
  22:              return File(renderedBytes, reportViewModel.LastmimeType);
  23:   
  24:          }
  25:   
  26:      }
  27:  }

Add a link to the page to open the report wherever is needed.


@{
    ViewBag.Title = "Home Page";
}
@section featured {
    <section class="featured">
        <div class="content-wrapper">
            <hgroup class="title">
                <h1>@ViewBag.Title.h1>
                <h2>@ViewBag.Messageh2>
            hgroup>
          
        div>
    section>
}
<h3>We suggest the following:h3>
<ol class="round">
    <li class="one">
        <h5>Print an RDLC report in MVCh5>
          @Html.ActionLink("Print Report", "PrintRepert","Report")
    li>
 
ol>

ok lets run and see.

And its working, there still more work to be done as checking the other formats, the email attachment, 
adding some security, the Multilanguage, and uploading this example and linking it here.

I would love to here some comments.

Update: for the business class, it really must come from your original entities. so for this sample this is the one im using
   1:   
   2:  namespace ASPNET_MVC_RDLC.Models
   3:  {
   4:      public class Business
   5:      {
   6:          public List<Employee> StubForEmployeeDataSet()
   7:          {
   8:              //this is used only to help in adding the dataset of type employee to the report definition
   9:              return null;
  10:          }
  11:          public List<Project> StubForProjectDataSet()
  12:          {
  13:              //this is used only to help in adding the dataset of type project to the report definition
  14:              return null;
  15:          }
  16:          //somew
  17:          public ReportViewModel GetMyRepoertViewModel()
  18:          { 
  19:          // I will not go through getting data from ef, i will assume some test data here
  20:   
  21:            //first dataset, employee info
  22:              var EmplyeeDataSet =new List<object>() {
  23:                      new Employee() { Name="Ahmed Khaled", Mobile = "055111111", Email="Ahmed.Khaled@Somewhere.com", BirthDate=new DateTime(1970,10,10)},
  24:                      new Employee() { Name="Jamal Awsom" , Mobile = "055222222", Email="Jamal.Awsom@Somewhere.com", BirthDate=new DateTime(1977,1,10)},
  25:                      new Employee() { Name="James Salem" , Mobile = "055333333", Email="James.Salem@Somewhere.com", BirthDate=new DateTime(1982,12,10)},
  26:                      new Employee() { Name="Tony Read"   , Mobile = "055444444", Email="Tony.Read@Somewhere.com", BirthDate=new DateTime(1982,4,10)}
  27:        
  28:          };
  29:          var ProjectDataSet =new List<object>() ;
  30:              for (int i=1;i<30;i++)
  31:              {
  32:                  EmplyeeDataSet.Add(new Employee() { Name = "James Salem", Mobile = "055333333", 
  33:                      Email = "James.Salem@Somewhere.com", BirthDate = new DateTime(1982, 12, 10) });
  34:              }
  35:              
  36:              //Assuming the person printing the report is me
  37:              var UserPrinting="Ali Taki";
  38:   
  39:              var reportViewModel = new ReportViewModel()
  40:              {
  41:                  FileName = "~/Reprots/MyMVCReport2.rdlc",
  42:                  LeftMainTitle = "ABC Company Name",
  43:                  LeftSubTitle = "DEF Department Name",
  44:                  RightMainTitle = "اسم الشركة",
  45:                  RightSubTitle = "اسم القسم",
  46:                  Name = "Statistical Report",
  47:                  ReportDate = DateTime.Now,
  48:                  ReportLogo = "~/Content/logo.jpg",
  49:                  ReportTitle = "Summary report for top employee's and projects",
  50:                  ReportLanguage = "en-US",
  51:                  UserNamPrinting = UserPrinting,
  52:                  Format=ReportViewModel.ReportFormat.PDF,
  53:                  ViewAsAttachment=false,
  54:   
  55:              };
  56:              //adding the dataset information to the report view model object
  57:              reportViewModel.ReportDataSets.Add(new ReportViewModel.ReportDataSet() { DataSetData = EmplyeeDataSet.ToList(), DatasetName = "Employees" });
  58:              reportViewModel.ReportDataSets.Add(new ReportViewModel.ReportDataSet() { DataSetData = ProjectDataSet.ToList(), DatasetName = "Projects" });
  59:   
  60:   
  61:              return reportViewModel;
  62:          
  63:          }
  64:      }
  65:  }